Opening the drive is quite simple. I just inserted a plastic pry tool (called a spludger) and ran it along the length of the back. It is really IMPORTANT not to try and open the case like a book. The key is to lever the plastic with the vent holes back: Away from the front of the case with the WD Logo. Take a look at the photos below as you see only 3mm or 4mm opening is enough to open the case..

Below you can see the vented part of the case is sliding off as I pry the gap GENTLY open. No need for force just be patient. Avoid metal tools plastic is fine.

Now the vented part of the case is a few mm back. The 4 retaining clips on the inside of the shiny cover are almost off. DONT TRY AN OPEN THE CASE LIKE A BOOK YOU MAY BREAK OFF THE RETAINING CLIPS. Its not the end of the world as the case will work fine without them.

Here the vented part of the case is even futher back and the clips on the shiny part of the case will disengage. You can see 2 tabs extending from the vented part of the case into the clips on the shiny part of the case.

The same shot but showing the base of the case. Again see how the vented part of the case is moving back.


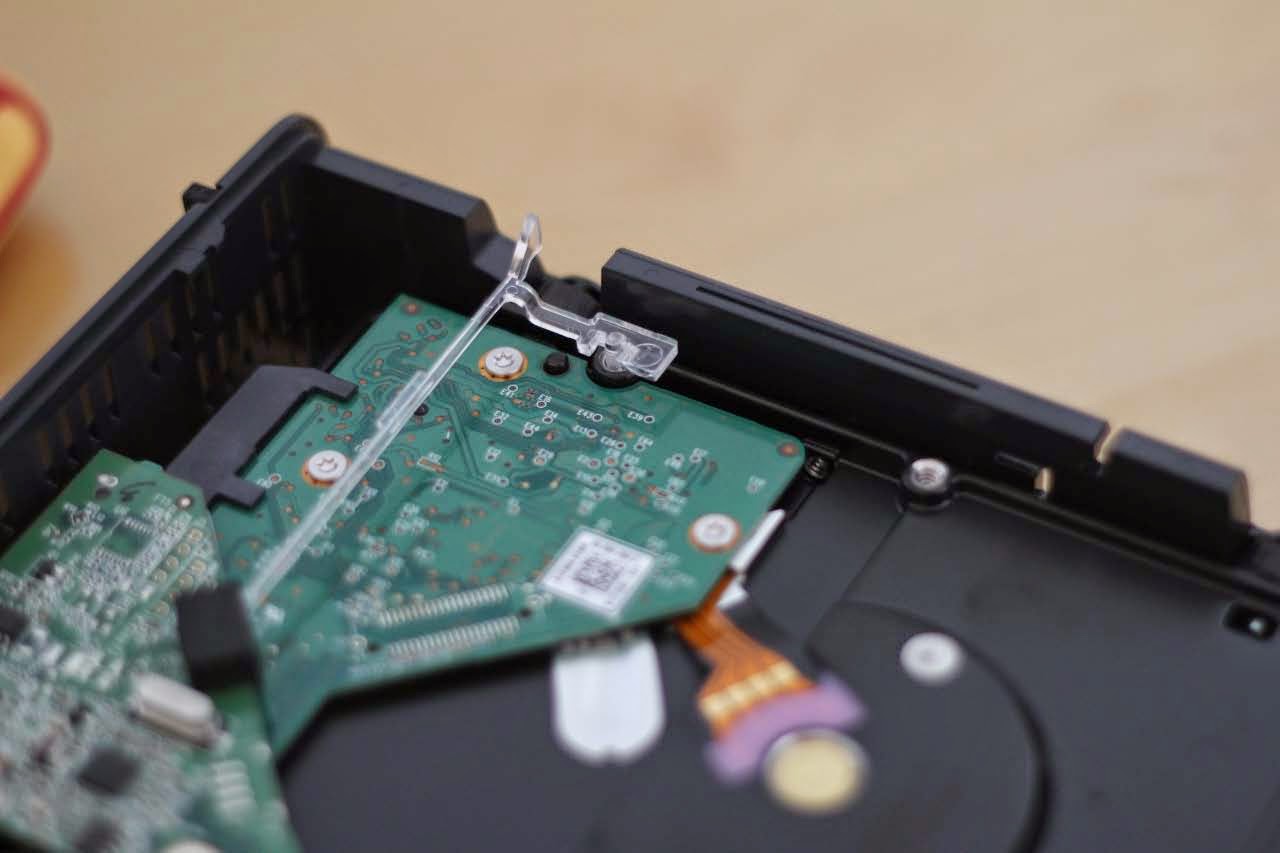
The HD is a stock WD Part. Note how the controller is held in place with one small Philips screw.

This is the other side and you can see the top of the HD

Ok before removing the drive from the vented part of the case that holds it we need to remove the SINGLE screw that hold the controller in place.

Now the screw is off .

There is a thin plastic light pipe that runs from an LED on the USB Controller to the front of the case.

Here is another shot showing the full run of the light pipe, It is thin optical plastic so take care not to snap it!
There is a SINGLE point where the light pipe is seated into one of the drive mounting holes. GENTLY grip the rectangular plastic and pull up to pull the light pipe vertically out ot the drive mounting hole.
You can gently unhook the thin end of the light pipe from the rubber shroud around the LED on the USB controller and rotate the part to loosen it if needed.
Below the light pipe has been removed. Its not needed for the drive to work but it is nice to see the LED.

Now the light pipe is off and the screw holding the USB controller remove one side of the drive can be gently lifted. You can see 2 of the rubber mount points on the drive have been exposed as the drive is free of the case on the top right of the photo below.

The power and USB port will clear the vented part of the case and you will be able to lift the drive and the USB controller off. Here the drive and USB controller are shown just after removal from the vented part of the case.

Gently slide the USB controller off the SATA drive by sliding it up (away from the camera in the photo above. The USB controller has a protective plastic triangle on the base. DO NOT REMOVE IT. It is used to prevent short ciruits with the PCB on the drive!

The rubber dampening feet just slide off. This reveals 4 shiny mount points. These are normally Torx 10 or smaller. If you don't have a Torx bit use pliers and a soft cloth or carefully use a watchmaker screw driver to loosen. You can remove these by hand once loosened.

That's it the bare drive is removed! Remember the drive may not work (if its >2tb) directly in a PC unless reformatted (wipe the partition and format)

No comments:
Post a Comment